


5 Balayage Highlights Techniques and Styles
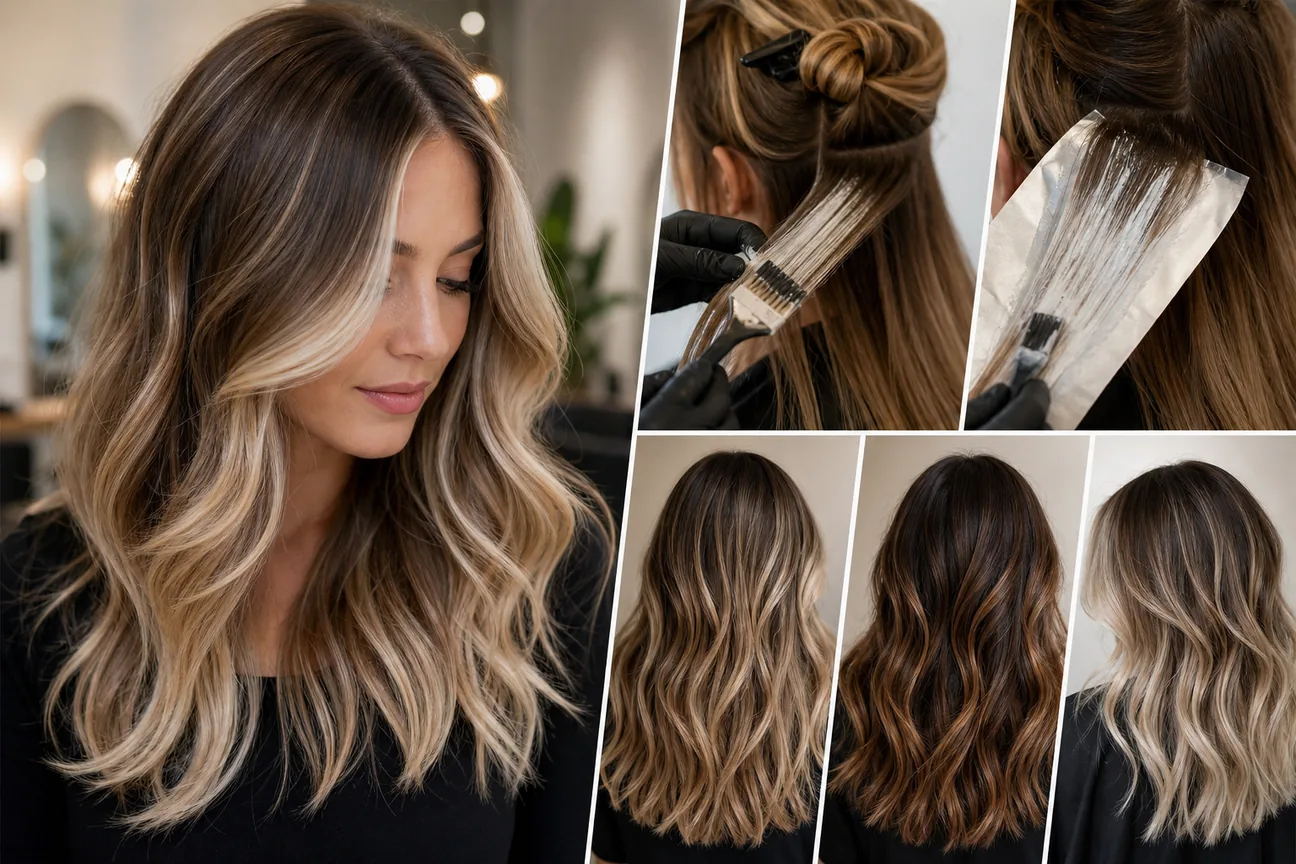
Balayage gets its name from a French word for sweeping, the motion used to paint color onto selected strands. The right placement can change the feel of balayage highlights, from soft, sunlit dimension to a brighter face frame. Here are five techniques and what to consider before choosing one.
Table of Contents
1. Classic Diagonal Freehand Balayage: Soft, Blended Dimension
Classic freehand balayage is a painting method. A stylist works through diagonal sections, applying lightener by hand instead of placing every strand inside foil. The brush often skims the surface near the roots and covers more of the ends, creating a gradual transition.
This approach may suit you if you want visible dimension without a stripe-like pattern. The direction of each section matters: diagonal placement can follow how hair falls, while the stylist changes the height and density of painted strands to fit your part and cut.
For a softer blend, the stylist can use light pressure near the root area, then add more product toward the ends. They may brush across the edge of the painted area to soften a hard line. The aim is an even, deliberate pattern, not matching strokes on both sides of the head.
Hair history helps shape the plan. Tell your colorist about past dye, lightener, or other chemical services, and explain how bright you want the result to look. If you’re comparing hand-painted placement with foil highlights, this comparison of balayage and highlights can help you name the finish you prefer.
Open-air painting leaves sections exposed as they process. That can work for a soft, blended effect, but the result depends on the hair’s starting color and condition. Ask how the stylist plans to check the lightened strands before deciding on a target shade.
2. Foilayage: More Controlled Lift for Selected Strands
Foilayage pairs hand-painted placement with foil around selected sections. It may suit someone who wants brighter pieces than open-air painting alone may create, while keeping some depth near the roots.

The stylist paints lightener through each chosen section, then folds it into foil. The foil separates that section from nearby hair. Placement can still follow a balayage pattern, with fine or broad sections chosen to suit the desired contrast and the hair’s density.
Because the foil keeps the painted section enclosed, this method gives the colorist a different way to manage how each piece processes. It doesn’t mean every strand should be treated the same way. A colorist can vary section size and saturation, especially where the hair has old color or fragile ends.
Foilayage may be worth discussing if you want a brighter finish or need selected pieces to stand out more. But brightness depends on the starting shade, previous color, and the condition of the hair. Ask what can reasonably be reached in one appointment, and whether a gradual plan makes more sense.
Key Takeaway:Foil changes how selected sections are enclosed during processing; it doesn’t remove the need to plan placement around your hair.
Before choosing this approach, ask how the stylist will handle previously lightened ends. Reapplying lightener over old color can add stress to already processed hair, so the color plan should account for its history.
3. Teased-Root Balayage: Added Dimension at the Transition
Teased-root balayage uses backcombing before lightener is painted onto a section. Some hair is gently pushed toward the scalp, while the remaining lengths are painted. Once the teased portion is combed out, it can soften the transition between the darker root area and lighter lengths.
This technique may suit you if you want a blended root with visible brightness through the mid-lengths. It can also help create a diffused line when the stylist is working across darker hair. The result still depends on section size and the amount of lightener applied.
Teasing can help soften the transition while leaving a root area, and foil placement and open-air painting serve different purposes.
Teasing isn’t a substitute for a careful consultation. Ask how much brightness will sit around your part, how the color will look when your hair is worn up, and whether the blend suits your upkeep preferences. If you have gray strands, your base color and desired level of coverage can affect the plan; gray-hair balayage may also be worth discussing with your stylist.
Fine or fragile strands near the hairline may need extra care. A stylist can assess those areas and decide how to treat them rather than applying the same tension and saturation everywhere.
4. V-Shaped Face-Framing Balayage: Brighter Placement Around the Face
V-shaped face-framing balayage places lighter pieces in a V pattern around the front sections. The color may sit higher near the face and lower as it blends toward the sides, adding brightness where the hair frames your features.
This option may suit you if you want a noticeable change around the front without asking for an even spread of lightness across the whole head. You can discuss whether you prefer a fine, subtle frame or more contrast. Bring a photo that shows the placement you like, not only the shade.
Hair length and cut affect how the pattern reads. Short layers can expose painted sections differently from long hair, while a part change may shift which pieces show most. If your cut is short, these balayage ideas for short hair offer useful language for describing placement.
Ask the stylist how the front pieces will connect with the rest of the color. A sudden jump from a bright face frame to dark lengths may feel more striking than you intended. A softer transition can use finer sections or less contrast farther from the face.
PS Aesthetics Wellness + Skinbar is a med spa and salon in Edmond, Oklahoma. Ask the team which salon color services are currently available and whether a consultation can help assess your hair history and preferred placement.
5. Brick-Lay Balayage: Even Distribution Across Sections
Brick-lay balayage uses offset sections rather than placing every painted piece directly above the last. The pattern can distribute brightness across the back and sides, with space between sections helping preserve dimension.
This technique may suit you if you want lightness spread through the hair without one solid band of color. A stylist can adjust the size of each section: larger sections may leave more depth between highlights, while finer sections can create a more blended look.
Diagonal subsections can follow the curve of the head. The stylist paints with controlled tension and changes brush pressure as needed, then checks that product hasn’t transferred to hair below. Placement can shift around the crown, sides, or hairline to suit how you part and wear your hair.
A brick-lay pattern is also a useful way to plan where the lightest pieces will show. If you often tie your hair back, mention that during the consultation; the stylist can consider the hairline and nape rather than focusing only on the top layers.
Pro Tip:Bring photos of your usual part and go-to hairstyle. They help the stylist plan where the painted pieces will be visible in daily wear.
For at-home color, avoid copying a professional sectioning pattern as if it were a full safety plan. Lightener choice and timing depend on hair condition and prior services. A home application can be uneven, and correcting it may call for more color work. If you’re unsure, get an in-person assessment before applying lightener.
Balayage Highlights Compared: Placement, Finish, and Upkeep
Use this comparison to describe the look you want. It’s a starting point for a conversation, not a promise of a set result. Your stylist can adjust the plan after reviewing your hair and color history.
Technique | Placement approach | Finish to discuss | Planning point |
Classic freehand | Painted diagonal sections | Soft, gradual dimension | Ask how much brightness can be reached in one session. |
Foilayage | Painted sections enclosed in foil | Brighter selected pieces | Review the condition of previously lightened ends. |
Teased-root | Backcombed sections with painted lengths | Diffused root transition | Decide how much natural root you want to keep. |
V-shaped face frame | Brighter front pieces in a V pattern | More focus around the face | Discuss how the front connects to the rest of the hair. |
Brick-lay | Offset sections across the head | Distributed dimension | Tell the stylist how you part and wear your hair. |
Upkeep depends on how close the color starts to the roots, how much contrast you choose, and how quickly your hair grows. Ask whether you’ll need a color refresh, a toner appointment, or simply a later reassessment. There’s no single schedule that fits every head of hair.
Frequently Asked Questions
What does balayage mean?
Balayage comes from a French word meaning “to sweep.” In hair coloring, it describes a hand-painted approach where a stylist places lightener on selected strands. The pattern can be adapted to your part, cut, and desired contrast. Balayage describes a technique, not one fixed color or finished style.
Is foilayage brighter than open-air balayage?
Foilayage may allow selected sections to become brighter than open-air painting, but the result depends on your starting color and hair history. Foil is one part of the method, not a guarantee of a particular shade. Ask your stylist what level of brightness is realistic for your hair and whether reaching it may take more than one visit.
Can I do balayage highlights at home?
At-home lightening is possible, but it’s hard to control placement and even saturation when you’re working on your own hair. The risk of uneven color or overlap can increase if the hair has been colored before. Don’t copy a developer volume or formula from a video. Ask a licensed salon professional to assess your hair if you’re unsure.
How often do balayage highlights need a touch-up?
There isn’t one touch-up schedule for everyone. Color placed farther from the roots may grow out less sharply than color applied close to the scalp, while a brighter or higher-contrast look may lead you to seek a refresh sooner. Ask your stylist what kind of upkeep your chosen placement may call for.
When should I seek medical help after hair coloring?
Seek prompt medical advice if you develop a strong scalp reaction, such as ongoing pain, swelling, or blistering. Get emergency care for sudden severe symptoms, including trouble breathing or swelling of the face or throat. For product-related concerns, follow the package directions and contact a health professional rather than trying another chemical service.
Conclusion
Choose the placement that fits your preferred contrast and upkeep, then ask a salon professional to assess your hair history before color work. PS Aesthetics Wellness + Skinbar is a med spa and salon in Edmond; contact the team through its website to ask about available salon services and whether an assessment suits your plans.

Comments